
__________________________________________
A Maya project is a directory structure for organizing the source and output files for an animation.
Our files will be under your Z: directory, in Z:\maya\projects
You should create 4 project areas one for class examples and three for projects:
class_examples, assignment_1, assignment_2, assignment_3
To create a new project:
File->Project Window
use default values and click Accept
To set to an existing project either use:
File->Set project
or
File->Recent Projects
_________________________________________
The scene file contains the information which defines your animation (models, animation information, texturing assignments, lighting, etc). This information can be stored in one of two ways, either in a .ma file as ASCII data (i.e. text which can be read and edited with a text editor like notepad) or in a machine readable .mb binary format file. The .mb file is more efficient in space and read/write time, while the .ma file gives you the option of editing information in the file. You really don't want to have to edit the text of a Maya scene .ma file, and typically this is done to fool a previous version of Maya into reading a file created by a newer version. To save yourself grief, try to stick with the same version, Maya 2014, throughout the class.
For this class either .ma or .mb is acceptable.
Always set a project before reading and writing scene files.
You should periodically save your work, and save revisions of your work.
File->Open Scene
or
File->Recent Files
to open a scene
File->Save Scene
File->Save Scene As...
to save a scene.
Any time you work on a computer you run the risk of power outages, file server problems, application software crashing and just plain old fashion overwriting important files. It pays to regularly save versions of your work. One method is to include a number within your file name, e.g. example_1.ma, and increase the number every time you save, e.g. next as example_2.ma, examples_3.ma, etc.
Or you can allow Maya to add a revision number for you and increment this when you use :
File->Increment & Save
Or you can have Maya automatically save and increment a version of your scene file by using Autosave. To turn on Autosave open:
Windows->Settings/Preferences->Preferences
and select Settings->Files/Projects under the Categories list on the left, and click AutoSave enable. Interval(minutes) allows you to set the time between saves.
_______________________________________
Alt-LMB - tumble (rotate) camera
Alt-MMB - track (translate) camera
Alt-RMB - dolly (zoom) camera
Useful Hot keys:
f - frame selected object. If you cannot find an object in your workspace, you can select it in the outliner.
a - frame all.
q - to access the Selection tool
w - to access the Move Tool
e - to access the Rotate Tool
r - to access the Scale Tool
4 - wireframe view
5 - smooth shading view
6 - textured view
7 - scene lighting view
Spacebar - to toggle between single panel workspace view and Four view mode.
________________________________________
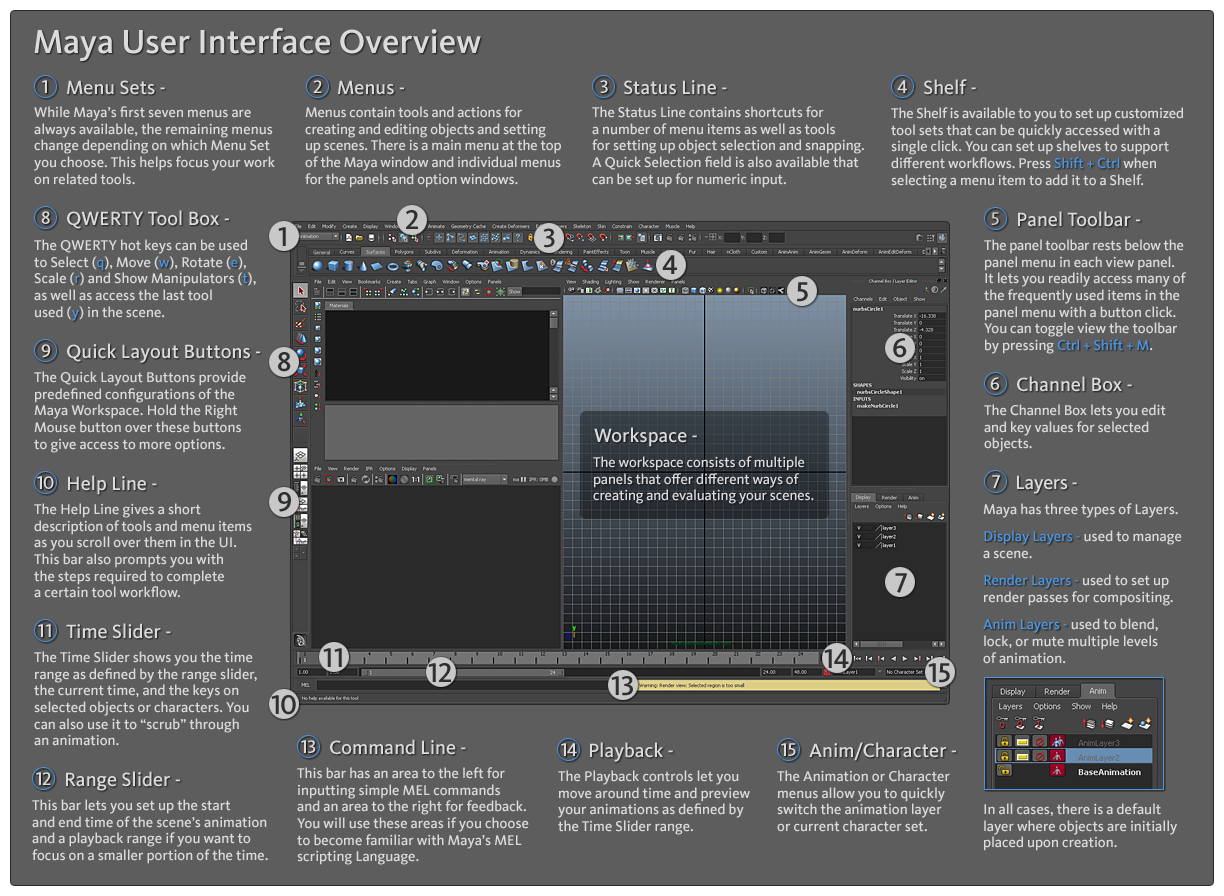
We discussed various buttons to access these windows. To access through the menus or hotkeys use:
Window->Outliner - directory of scene components
Window->Animation Editors->Graph Editor - detailed view and controls for manipulation of animation key frame information
Window->Attribute Editor - (or Ctrl-A - toggles w/ Channel Box) information on attributes with information on component nodes and connectivity
Channel Box - (Ctrl-A - toggles w/ Channel Box), accesses a subset of attributes which can be keyed for animation.
_________________________________________
Create->Polygon Primitives->(primitive type)
Selecting the box after each primitive opens a creation tool, allowing you to change the initial configuration of the geometry. This would include the initial dimensions, number of subdivisions along a certain dimension, or orienting the object to a certain axis, etc.
The creation attributes can later be changed by accessing the creation node in the attribute editor.
_________________________________________
Transform Node (e.g. pSphere1) - contains the translation, rotation and scaling information of an object.
Shape Node (e.g. pSphereShape1) - contains the geometric definition of the object.
Creation Node (e.g. polySphere1) - contains the attributes necessary for the initial creation of the topology of the object. The topology of the object can be changed by altering the attributes of this node. Creation nodes can be removed by deleting the history of the object with Edit->Delete by type->History.
Shader Group Node (e.g. intialShadingGroup) - interface object for texturing and material assignment.
Material Node (e.g. lambert1) - contains the surface characteristics of the object.
__________________________________________
Select object and
Modify->Freeze Transformations
Resets the values of the Transform Node. This normalizes the current state of the transforms, in that the current position and rotation values become the new 0,0,0 values for translation and rotation, and the and the current scaling becomes the new 1,1,1 values for the scale attributes.
__________________________________________
The pivot point establishes an object's point of rotation and the point at which an object scales. The pivot is also the point where an objects position is measured relative to the world space origin. To change the pivot point of an object, select the object, select the Move Tool (hotkey w) and hit insert.
The MoveTool cursor will change to axes without arrows. Click and drag the axes to reposition the pivot point. When finished click insert.
You can automatically center the pivot by selecting an object and using
Modify->Center Pivot
__________________________________________
Components of a polygon (vertices, edges, faces) can be manipulated by switching into component mode. RMB and hold over a polygon, and select desired component type. To return to object mode and select the polygon as a whole, RMB and hold over the polygon and select object mode. The status line icons for object and component mode are another way to access these modes.
__________________________________________
Select an object and open the Channel Box.
Select a time in the time slider, either by clicking a frame within the time slider or typing the frame number to the right of the time slider.
Use the Move, Rotate and/or Scale Tools to position the object.
In the Channel Box, click the name(s) of the attribute(s) to key, RMB and hold over the attribute name and select Key Selected.
Select a new time and new position and repeat the process.
___________________________________________
Objects can be organized in a parent/child hierarchy, so that child objects inherits the transformation information of the parent, and in turn the transformation information up the parent chain. Each child object maintains their own transform node, so that the final translation, rotation and scaling of the child object is a function of their transform node and all other transform nodes up the hierarchy.
There are two common ways to make an object a child of another object:
In the Outliner:
MMB click and drag the child object onto the object to be the parent.
Or with the hotkey p:
select the child object first, then shift-click the parent object, the hit the p key.
____________________________________________
Copy Y:\Courses\2014-2015\AC5002_Conroy_AU2014\examples\arm.ma to your Z:\maya\projects\class_examples\scenes directory
To create this, create a polycube and scale it in the x-direction.
Use insert to reposition the pivot at the far end.
Rename it segment_1
Select segment_1 and use ctrl-d to duplicate, which will create segment_2. Use move tool to drag segment_2 in the positive x direction to the end of segment_1.
Select segment_2 and duplicate, creating segment_3. Move segment_3 to the end of segment_2.
Select all three and use Modify->Freeze Transformations to remove problems with scale and rotation.
In the Outliner, MMB drag segment_3 on top of segment_2. segment_2 if now the parent of segment_3.
MMB drag segment_2 on top of segment_1.
You should now be able to key rotate Z for each of the segments.
Notice that segment_3's total z rotation is the sum of all three transformations in the hierarchy.
_____________________________________________
Copy Y:\Courses\2014-2015\AC5002_Conroy_AU2014\examples\phone_toy_1.ma to your Z:\maya\projects\class_examples\scenes directory
For this in class example, we want to determine how to set a hierarchy for this collection of objects.
Which parts will share a common set of transformations? For instance, which objects translate, rotate or scale as a group?
Which parts will have unique transformations? For instance, which objects will translate in their own separate direction? Which objects rotate around a unique pivot?
An object which shares transformations with other objects, but do not need it's own unique movement, rotation or scaling, can act at a parent to other objects.
Use the Outliner organize the hierarchy and key the movements of the components to reflect the action of the toy.
Hint - a wheel which rotates 360 degrees will travel pi times the diameter of the wheel. If the diameter of the wheel is 4, one complete turn will travel 12.56 units.
Solution is in phone_toy_2.ma.
_____________________________________________
Object can also be grouped. There are two main reasons to group objects
1) To more clearly organize elements objects within a scene. If we are modeling a car, we could have a "wheel" group containing lug nuts, a hub cap, a wheel rim, and a tire. This functional grouping would allow us to segregate wheel components from objects which would make the engine or the dashboard.
2) To provide more than one transform node for an object. Objects needing multiple methods of movement, rotation or scaling, or multiple pivot points. To animate the Earth we need two different rotation operations. The first is for the Earth to rotation around it's own Y axis (ignoring the tilt of the Earth's axis) and the second is for the Earth to rotate around the sun. A sphere with a centered pivot provides for the first rotation. A group including the Earth with a pivot centered at the sun provides the second.
Select the objects to group and either use hotkey ctrl-g or Edit->Group
______________________________________________
Copy Y:\Courses\2014-2015\AC5002_Conroy_AU2014\examples\earth_1.ma to your Z:\maya\projects\class_examples\scenes directory
As mentioned above, the Earth rotates in two significantly different ways. Yet the polygon sphere representing the Earth in earth_1.ma has only one transform node. When we select the sphere, we see that the pivot is in the center, which is ideal for animating Earth's rotation around it's axis.
Select earth and hit ctrl-g, which will create a group including the earth sphere. Open the Attribute Editor and look at group1.
Notice that unlike the sphere which has five tabs representing 5 different node types (transform, shape, creation, material, shading group), group1 has only one tab. Groups are simply transform nodes.
Also notice the pivot of the group, which is located at the world origin.
Rename group1 to earth_orbit.
Select earth and earth_orbit and separately rotate and notice that we now have a mechanism to key both rotation types for earth. Use Ctrl-Z to undo these test rotations.
Now select the moon and hit ctrl-g. A new group1 is created. Rename this group1 to moon_orbit.
Unlike earth_orbit, the default location of the moon_orbit pivot is not where we need it. Switch to the top view in the workspace and use the Snap to Grids button in the status line.
Select moon_orbit and hit insert to move it's pivot to the center of the earth.
We need the moon_orbit to follow the earth_orbit, and not the earth itself. Why?
Parent the moon_orbit to the earth_orbit.
Key rotations or earth_orbit, earth, and moon_orbit. Test the results.
Solution is in earth_2.ma.
______________________________________________
This example has more levels of complexity than the Phone Toy, but it's organization can be broken down in the same way.
We will discuss this in class.
Solution is in Y:\Courses\2014-2015\AC5002_Conroy_AU2014\examples\spider_toy.ma